3CX SIP Trunk Settings & VoIP Configuration Setup
3CX Phone System for Windows is an award-winning software-based IP PBX that replaces traditional proprietary hardware PBX / PABX. It is entirely SIP standard based, and therefore interoperates with most popular SIP phones, SIP VOIP Gateways and SIP VOIP providers. It is intended to completely replace a traditional PBX, be easily manageable by system administrators and to integrate well with Windows Network infrastructure.
3CX allows businesses to experience the multiple advantages of a SIP PBX through its fully functional 3CX Phone System Free Edition and its fully supported and competitively priced Commercial Editions.
VoIPVoIP SIP trunking service enables customers to make calls from 1.9 cents/minute with no volume commitments, no monthly fees, no channel restrictions, with optional availability of US phone number with area code of your choice (or port you own US phone number for free), 800 toll free numbers or Virtual Phone Numbers from any 40+ countries of your choice.
Click here to learn more about VoIPVoIP Sip Trunking service and prices.
Below you can find 3CX SIP trunk settings and configuration guide for voip setup with VoIPVoIP phone service.
This configuration guide assumes that you have already downloaded and installed 3CX Phone System (version 7.0 or better) from 3CX.
While our goal is to make all Use Your Own Device installations as easy as possible, this option is intended for advanced users. VoIPVoIP can not provide full technical support for all IP PBX systems. If your system is not working as expected, you may need to contact the device manufacturer for technical support.
STEP 1
In the 3CX Phone Management console click on the "VoIP Providers" from the left menu. Click on "Add VoIP Provider" button on the top of the page and " Add VoIP Provider Wizard" page appears.
Specify "VoIPVoIP" as the name of the provider, choose "Generic SIP Trunk" or "Generic VoIP Provider" and click "Next" button.
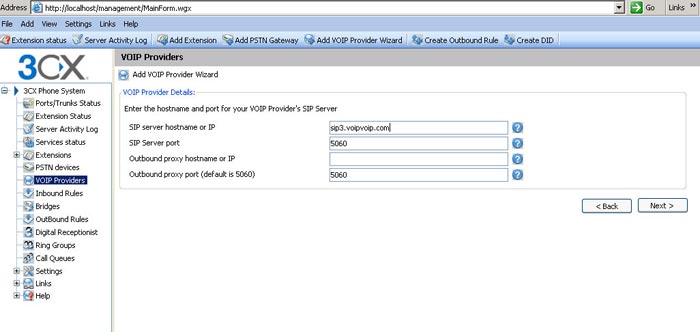
STEP 2
In the 3CX Phone Management console click on the "VoIP Providers" from the left menu. Click on "Add VoIP Provider" button on the top of the page and " Add VoIP Provider Wizard" page appears.
Enter the following:
SIP Server hostname or IP : sip3.voipvoip.com
Click "Next" button.
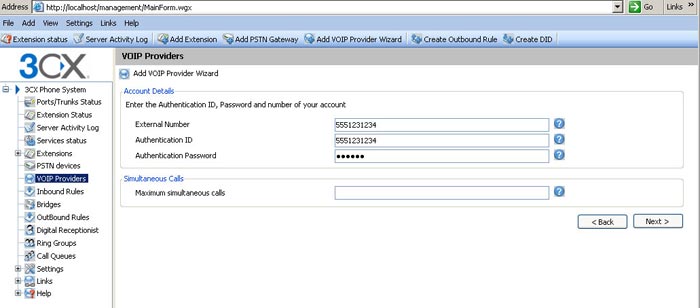
STEP 3
"Account Details" page appears.
Enter the following:
External Number : e.g. 5551231234 (your VoIP VoIP account assigned while signing up)
Authentication ID : e.g. 5551231234 (your VoIP VoIP account assigned while signing up)
Authentication Password: your VoIPVoIP password (passwords are case sensitive )
Maximum simultaneous calls: 20
Click "Next" button.
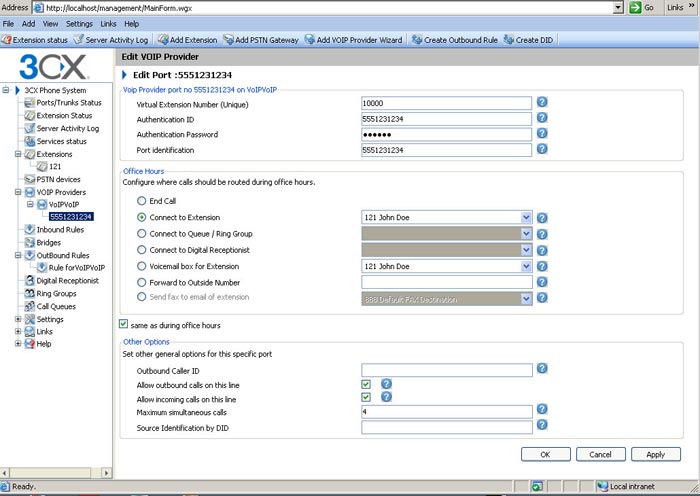
STEP 3
"Configure where calls should be routed" page appears.
Choose "Connect to Extension" or "Connect to Digital Receptionist" if you already configured one:
Click "Next" button.
"Create an Outbound Call Rule" page appears.
DO NOT SKIP this page. You need to fill at least "Calls from Extensions" field or configure outbound route according to your PBX settings to start using this SIP Trunk with a SIP client.
Click "FINISH" button to register the line.
STEP 4
Confirm the line is "Registered" by selecting the "Ports/Trunks Status" link from the left menu.
Also confirm any extension using the line is "Registered" by selecting the "Extensions Status" link from the left menu.
A "Green" light will indicate a successfully registered line. A"Red" light indicates the line is not registered. If not registered, confirm your account details are as below.
Restart All the PBX service at "services Status" link and check again if the line is registered.
Make Calls!
Receiving Calls
If you have a US or International virtual phone number from VoIPVoIP and cannot receive calls go to advance tab of Voip provider and change the default registration from "no registration" to "register inbound and outbound calls"
Problems? One of the following changes might resolve the problem;
Please go to Settings -> Networks -> STUN Server and make sure that the "Turn off stun server" box is ticked. If the box is ticked and the problem continues, please go to Settings -> Network -> Ports and change the SIP Port to 5466. Finally please make sure that the Enable Keep Alives box under Setting -> General -> Global Options is ticked.
Still problems? Please check our installation troubleshooter.