Switchvox SIP Provider Settings & VoIP Configuration Setup
Switchvox is a leading provider of PBX and VoIP phone systems for small- to medium-sized businesses (SMBs). The company's SOHO product enables small and home offices to easily and affordably create and manage their phone system, using traditional analog lines, as well as VoIP services. The Switchvox SMB product is a full-featured, more advanced IP PBX system for larger organizations.
VoIPVoIP SIP trunking service enables customers to make calls from 1.9 cents/minute with no volume commitments, no monthly fees, no channel restrictions, with optional availability of US phone number with area code of your choice (or port you own US phone number for free), 800 toll free numbers or Virtual Phone Numbers from any 40+ countries of your choice.
Click here to learn more about VoIPVoIP Sip Trunking service and prices.
Below you can find Switchvox SIP provider settings and configuration guide for voip setup with VoIPVoIP phone service.
While our goal is to make all Use Your Own Device installations as easy as possible, this option is intended for advanced users. VoIPVoIP can not provide full technical support for all IP PBX systems. If your system is not working as expected, you may need to contact the device manufacturer for technical support.
STEP 1
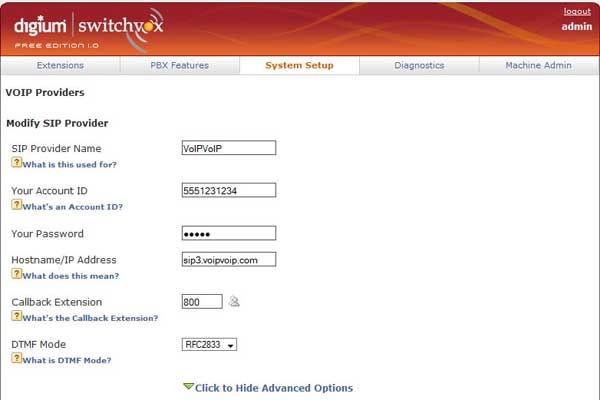
First log into the Admin Portal. Navigate to SYSTEM SETUP / SIP PROVIDERS.
Select ADD New SIP Provider and Input the following information:
SIP Provider Name : VoIPVoIP
Your Account ID : e.g. 5551231234 (your VoIP VoIP account assigned while signing up)
Password: your VoIPVoIP password (passwords are case sensitive )
Host name / IP Address: sip3.voipvoip.com

STEP 2
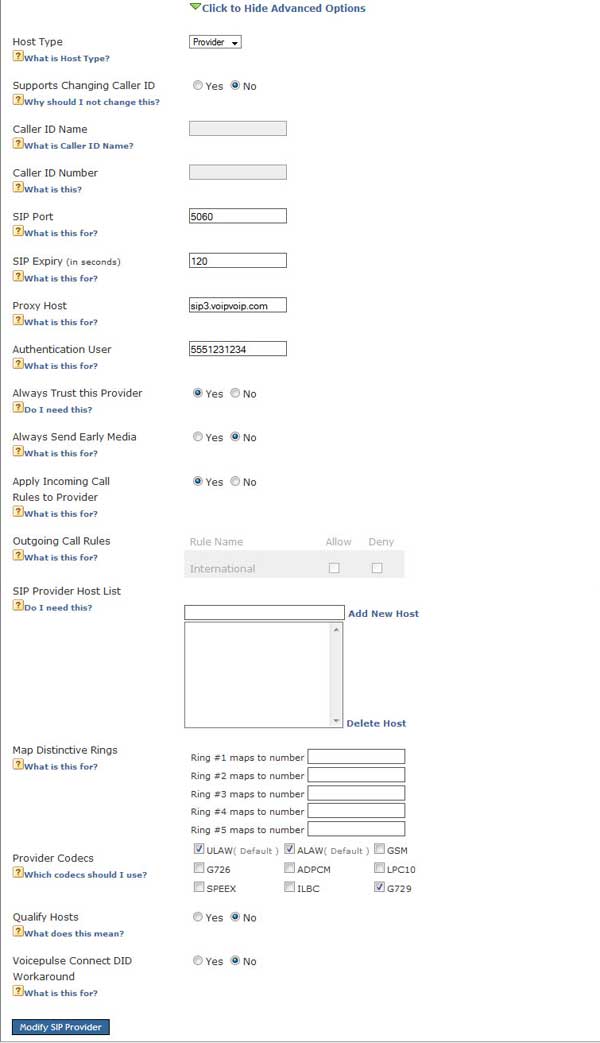
Select "Click to Open Advanced Settings"
Make sure the settings are as follows;

STEP 3
Before you can use the service, you need to first establish your Outgoing Calls settings.
Navigate to SYSTEM SETUP/ OUTGOING CALLS.
Select "Add New Rule" and Input the following information:
Rule Name: VoIPVoIP
Is this rule final: yes
Call Through: SIP Provider
SIP Provider: VoIPVoIP
Click on "Add outgoing rule"
You should now be ready to make and receive calls from VoIPVoIP Network
NOTE
If you ara behind NAT with Switchvox you need to enable port forwarding on your router to allow calls to reach your PBX. The following ports need to be forwarded from your router to your pbx:
UDP port 5060
UDP ports 10000-20000
After port forwarding has been enabled on your router, you will need to tell the PBX of this change. To do this, go to the "Network Settings" tab of the "Machine Admin" menu of your Switchvox admin page.
Select the "Yes" option under "Allow Nat Port Forwarding", and fill in th external IP address of your router in the box below. If you don't know your router's external ip address, it can be obtained from your ISP. You can also obtain it from: https://www.portforward.com
Click the "Update Network Settings" box.
Problems? Please check our installation troubleshooter.
