Zyxel Prestige 2000w VoIP Settings Configuration Guide

ZyXEL's P-2000W VoIP Wi-Fi phone, compatible with IEEE 802.11b wireless standard, is a perfect solution for Voice over IP applications. It allows users to make or receive phone calls as long as they are in the coverage of IEEE 802.11b or 11g wireless Access Points. By using the P-2000W, users no longer have to pay expensive communication fees and can enjoy the convenience of wireless mobility.
STEP 1
BEFORE YOU BEGIN, please note the following:
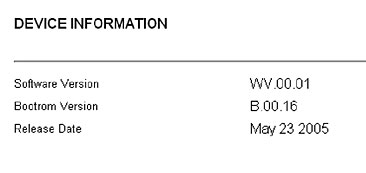
The appropriate version of the firmware needed is WV.00.01. If you do not yet have this firmware installed, please do so before configuration. Firmware is available within the Support section of the ZyXEL web site:
www.ZyXEL.com
If the ZyXEL Prestige 2000W_v2 phone key pad is locked, press and hold the # key for 3 seconds or until the phone icon is displayed.
The ZyXEL Prestige 2000W_v2’s default network mode is DHCP. If you require either STATIC or PPPoE connection type you must:
- On the phone, press the Menu key.
- Scroll down to #4 Net Settings and press Select.
- Select #1 Network Mode
- Scroll down to either Fixed IP or PPPoE and press Select.
- The phone will display “Ok”.
If you selected Fixed IP, select and enter in the appropriate entry locations your IP Address, Subnet Mask and Gateway.
OR
If you selected PPPoE, select and enter in the appropriate entry locations your PPPoE Username and PPPoE Password
STEP 2
The following screen images represent a recommended configuration of the ZyXEL Prestige 2000W_v2 for use on the VOIP VoIP service. These parameters need to be manually entered using the device’s web server GUI as no auto-configuration method is not yet available.
- From the phone’s display, select Menu by pressing the Left soft key.
- Using the Up/Down arrow buttons scroll and hi-light ‘Information’ and press the Select key.
- Scroll to IP Address and press the Select key.
- In an Internet browser on a PC connected to the same network enter the IP address displayed on the ZyXEL Prestige 2000W_v2.
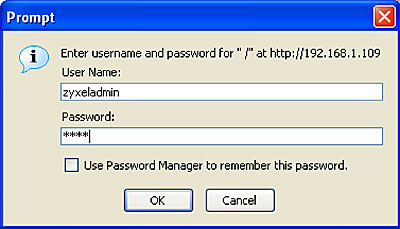
- When prompted enter the User Name ‘ZyXELadmin’ and password ‘1234’ as illustrated below. The Password will be represented by ****.

The following information will display in your browser.

STEP 3
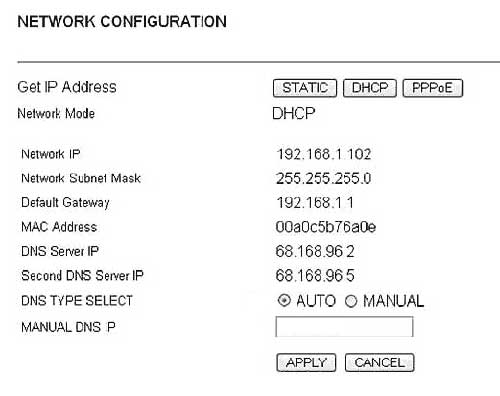
From the Left panel, select Network to display the following screen.

Select the appropriate network connection type for your network: STATIC, DHCP, OR PPPOE.
If you are using a STATIC connection, enter all network parameters.
If you are using a DHCP connection, leave DNS type as auto
If you are using a PPPoE connection, you must enter the PPPoE User/Login Name and PPPoE Password provided by your DSL Internet service provider.
Click the Apply button.
Click SIP in the Left panel. Complete all SIP proxy parameters as listed below;
SIP Server Address: sip3.voipvoip.com
SIP Server Port: 5466
Registrar Server Address: sip3.voipvoip.com
Registrar Server Port: 5466
Register Expiry Time: 3600
Display Name: Enter your full name, this will show up as part of your caller ID.
User ID: Enter the account number assigned to you when signed up for VoIPVoIP service.
Password: Enter the same password used to login to your VoIPVoIP account
Click the Apply button.
STEP 4
Click NAT TRVSL in the Left panel. Using the drop down menu for Select Type choose NONE
Click the Apply button.
STEP 5
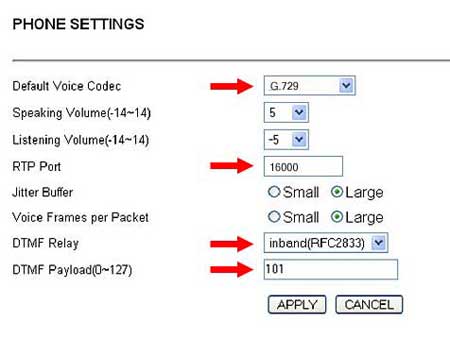
Click on PHONE in the Left panel. Enter the parameters as indicated:
Default Voice Codec:"G.729"
RTP Port: 16000
DTMF Relay: inband(RFC2833)
DTMF Payload: 101

Click the Apply button.
STEP 6
Power cycle you phone by pressing and holding the red power OFF button for three (3) seconds.
Then press and hold the red power button for two (2) seconds until the device restarts.
Monitor the registration process on the display screen. The ZyXEL Presitge 2000W_v2 will first Associate with your access point, display the AP SSID and then the phone’s IP Address.
Shortly thereafter, the phone will display Registered . When registered on the VoIPVoIP network, you will ready to make and receive calls.
STEP 7
Make Calls!
Problems? Please check our installation troubleshooter.
NAT/Firewall Issues
If you get one-way audio, please take the time to double check your configuration as above. If everything appears to be correct, the problem may be NAT/firewall. Make the following changes and try again.
